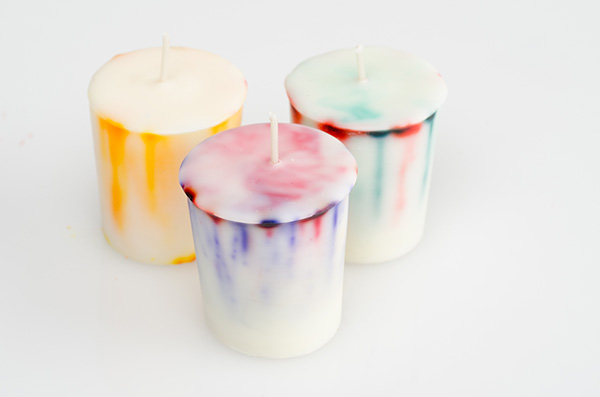
Votives are a quick and inexpensive way to show your creativity. Plus, they aren’t that difficult to master! Votive candles, when burned properly, give off as much scent throw as a container candle and can be colored in a variety of ways. (Make sure to always burn votives in a proper fitting votive candle container for maximum burn time as well as safety.) Coordinate your scent choices with colors for holidays or special occasions! Orange & black dye flakes combined with Candy Corn fragrance oil would be perfect for Halloween; try red and green dye flakes combined with Christmas Past fragrance oil for a festive holiday.
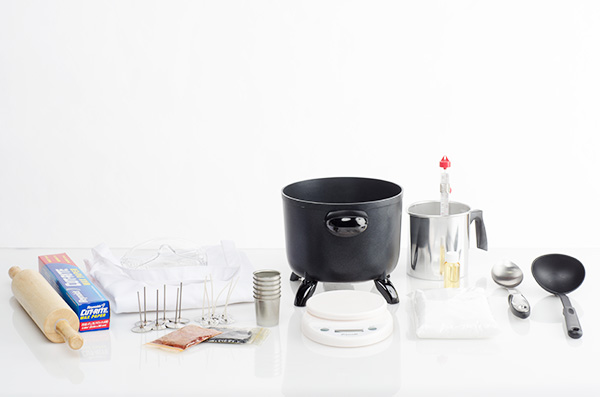
Materials List:
Votive/Pillar Wax (suggestions listed below…)
• KY 133 Versatile Paraffin Wax
• KY 143 Paraffin Pillar Wax
• KY Para-Soy Tart & Votive Blend (used in this tutorial)
Digital Scale
Fragrance Oil, if desired
Candle Dye Flakes, multiple colors
Pour Pot / Glass Pyrex Measuring Cup
Thermometer
Votive Molds (6)
Wick Pins (6)
36-24-24 Zinc Votive Wicks (6)
Presto Pot or Double Boiler to melt wax
Metal Spoon to stir wax
Rolling Pin
Safety goggles
Apron to protect clothing
Wax paper, old newspapers or aluminum foil
Cover counter with wax paper, old newspapers or aluminum foil to make clean up easier. Be sure to wear safety goggles for eye protection. You do not want to be splashed in the eye with hot wax! Remember with wax – safety first.
Step 1
Prepare the votive molds by placing a wick pin in each mold.
Tip: Place the votive molds with wick pins on a cookie sheet to make moving them easier.
Step 2
Melt the wax with the chosen method – Presto Pot or double boiler. Make sure to follow the wax manufacturer melting and pouring guidelines for correct temperatures. For this tutorial, KY Para-Soy Tart & Votive Wax is being used so it will need to be heated to approx. 165° F. Use the thermometer to correctly and properly monitor the temperature.
Step 3
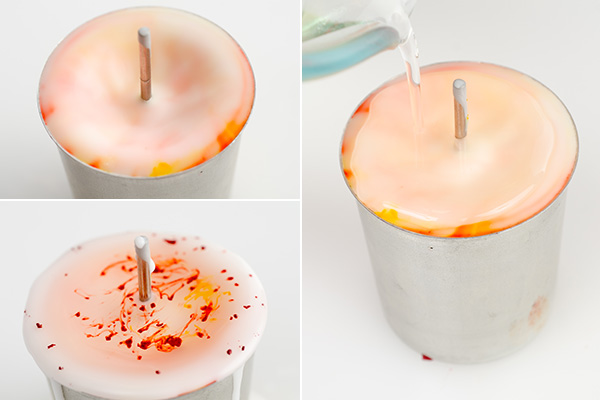
Prepare dye flakes for a tie dye look. Crush the flakes into smaller pieces – doing this will work more effectively to give a desired look on the finished product. Set to the side.
Tip: Place dye chips in a small zip lock bag and use a rolling pin to crush the flakes into small, usable pieces.

Step 4
Set the pour pot on the digital scale and tare. Transfer needed amount of wax to pour pot — in this tutorial (6) 2oz. votives will be created, so 13 oz* total of wax will be needed. Transfer 13 oz* of wax, and add 1 oz of Rustic Escentuals Fragrance Oil**. Stir well (approx 2 min).
Step 5
Fill votive molds to the top without overflowing. When all the molds are filled begin to sprinkle the dye flakes onto the tops of the votives, alternating between colors. The flakes will begin to melt & sink in the molds creating a one of a kind tie-dye effect.

Step 6
After wax has cooled and shrunk, prepare to do the repour. Carefully fill in the crevice all the way to the top without over pouring. If desired, more dye flakes can be sprinkled onto the top of the repour.
Step 7
Let the candles cool completely. If they don’t fall out by simply inverting the mold, give it a firm, quick tap on a sturdy surface — this should loosen them and they’ll fall right out of the candle mold. Remove wick pin, insert wicks, trim wick, and you’re ready to enjoy! Let candle cure for 48 hours before lighting to maximize scent throw.

Notes:
*Wax weights are approximate and not exact.
** Wax, fragrance oil, and candle dye color selections in this tutorial are for demonstrative purposes only.
All measurements are by weight, not volume.
SOME SAFETY PRECAUTIONS
- Cover counter with wax paper, old newspapers or aluminum foil to make clean up easier.
- Be sure to wear safety goggles for eye protection. You do not want to be splashed in the eye with hot wax! Remember with wax – safety first.
- Waxes used in making candles are very similar to cooking oils – they are flammable and they are poured at high temperatures, but with certain precautions, accidents may be avoided. NEVER HEAT WAX ABOVE 210°F.
- For safety, wax should be melted in a double boiler. Wax should NEVER be heated directly over an open flame or burner. Direct heating can cause wax to explode and result in serious injury.
- Use of a thermometer is advised to ensure proper wax pouring temperature.
- Never leave hot wax unattended. Keep children and pets away from the area where wax is being melted and poured.
- Never pour water in a wax fire. Water will cause the fire to spread. To extinguish a fire in a pan, cover the pan with its lid. Use a dry chemical fire extinguisher.
- Never pour melted wax into the sink or other drains.